Tuesday, February 25, 2014

Chatting with Justin Rothshank


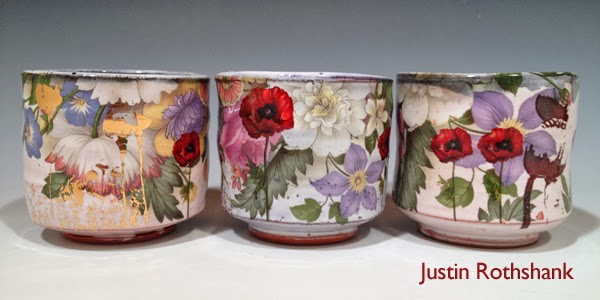
Maybe you've noticed some fancy work displayed on our website's decal page -- that's the work of Justin Rothshank, master of pots, decals, and all things surface decoration.  Here at The Ceramic Shop, we've long been a fan of his complex, layered work, and now that he's been working with gold luster decals -- our new obsession! -- we love it even more.  Justin was kind enough to take time out of his busy schedule to answer a few questions about his process, his workflow, and his motivations.  Enjoy!


What is your driving force to create?

It's twofold. First, I love to experiment, learn, and test. I look forward to working in the studio every day. Whether it's trying new forms for pots, making new decals, testing new glazes, or firing kilns in a different way the rewards of making and getting better at what I do are what drive me.

Second, selling what we make is how my wife and I support ourselves and our family. There's nothing like a mortgage payment or health care bill to keep you motivated everyday.


Describe a typical day in the studio.

I load or unload a kiln nearly everyday. If theres a kiln to unload in the morning, that's usually the first thing I do. I pack and ship pots several days a week. If there's a way to put that off till later, I usually do!

Most studio weeks rotate between a bit of glazing, a bit of making new pots, and a bit of decorating with decals. I fire kilns 3-6 times of week depending on production needs. I need to fire my pots 3-5 times each to complete my decorating process.

I try to photograph pots daily. I spend a few hours a week designing decals, and doing computer work.

While all of this seems like a jumble of tasks, I find a regular routine pretty easily, and work 40-60 hours a week depending on the season.


What are your favorite tools -- what can you not live without?

My favorite throwing tool is a green rib from mudtools. I have a pair of red handles scissors that I've been using for the last 10 years that are extremely important to me for cutting out decals. Lastly, my kilns are critical to my process and I spend a remarkable amout of time with them!

Is there a person place or thing that was most influential in your decision to pursue a career in the arts? This could be a teacher, a trip you took, a book, etc..

My wife is a critical partner in my process. While she doesn't work with me in the studio (she has her own studio for painting/drawing) her support and knowledge of my life as a working artist has been very influential.

Secondly, I've had a series of supportive friends over the past 10 years who have given me guidance, shared advice, and directed me to answers for technical problems, business solutions, and career support.

What advice would you give someone who is looking to pursue a career in ceramics?

Whenever I'm asked this question I always answer the same thing. Make lots of work. Tons of work. You get better thru dedicated practice and there is no replacement for time spent making.

..................................................................................................................

If you want to see more of Justin's awesome work, check out his website here: http://rothshank.com/justins-work/


Friday, February 14, 2014

The Cash Money Blues

I've been making a bunch of demos for our upcoming NCECA demonstration table, and I've been having a blast doing it.  Making pottery for work?  Livin' the dream, right? Previously I wrote about the Catalyst tools by Princeton Artist Brush Co. that I used to create my wheelthrown forms; today, I'm going to talk about glazing.  I just opened my little ConeArt test kiln this morning, and here are my results -- not too shabby!

Mean muggin'.

These forms were made with Standard Stoneware 259, which is a very easygoing claybody for throwing.  Very forgiving with enough grog to make you feel kinda tough, this is a claybody that turns an extremely attractive toasty brown in reduction.  Because I primarily fire oxidation here, though, I needed my glazing to punch up the electric kiln results.  Luckily, here at The Ceramic Shop we make our own Professional Cone 6 Glazes here that aim to do just that, so I had plenty of options.  

The mug pictured in back is glazed in the Ceramic Shop's cone 6 Tomato Luster. This glaze has always been reasonably popular, but for me, it's one of those glazes that I have become fanatical about over the past few months.  It's a workhorse -- delivers beautiful results with incredible consistency across a variety of claybodies, and has this gorgeous, variegated surface complete with tiny green crystals. Here's a picture of Tomato Luster over some mugs I made from the deep dark Standard Stoneware 266, fired, again, to cone 6 oxidation:


Toasty situation.

Here is a close-up detail of those awesome little green crystals:


That's rich.

The other two mugs pictures in the top image were glazed with The Ceramic Shop's deep cobalt-blue cone 6 offering, Cash Money Blue.  It's rich enough to pop up a beautiful deep blue on most claybodies (save for the very darkest, such as Standard 266), but has just enough translucence to allow the underlying body to peek through.  This works great for me, because I love the juxtaposition of glazed surface and raw claybody -- and I toyed with just this in my NCECA demo mugs. With the mug on the top left, for example, I simply dipped it and then let it dry; once I could handle the dried glaze, I took a moist (but wrung-out) sponge and removed the glaze from the bottom and the lower surface.  This just left behind some glaze in the mug's textured cracks, resulting in that shiny glaze/matte clay look that I love so much!


Won't you join me for a drink?


"But Gina," you may ask, "what about all of that glaze run-off you create when you wipe perfectly good glaze off with a sponge?"  Fair enough, good people of the internet -- and there's an easy answer for you.  Because I have the storage space here at work to do this, I keep a series of well-labeled deli pint containers (with lids) filled with water.  Each container corresponds with a glaze that I use frequently, so when I elect to do a wiped finish, as seen above, I can simply dip my little yellow sponge into the water and the remnants of that glaze collect in a contained space.  Once I accumulate enough wiped-off glaze, I simply drain off the clear water once it has settled out and am then able to fully reconstitute that run-off back into a glaze, with no worries about contamination. 

If you are looking for reduction-worthy results from your cone 6 oxidation firings, consider our Professional Cone 6 glazes -- and, as always, we welcome your own tips for application and images of your work using our glazes as well!

Tuesday, February 11, 2014

Meet our glaze tech, Rachel.

Here at the Ceramic Shop, we don't just act as pottery suppliers -- we produce quite a bit of our own material, as well.  From HydroBats and kiln posts to glazes and wax products, all of our own-brand items go through a rigorous and extensive period of development, testing, and more testing.  

We don't play.

So who, exactly, is behind this development and testing?  While we have many different people working on a variety of different projects, our head glaze tech, Rachel, runs all of our glaze- and ceramic-based product development. Rachel has been part of The Ceramic Shop team for over a year now, having come to us from the highly-respected ceramics program at the University of Oregon.  There, she was truly well-trained when it comes to glaze and claybody formulation -- this is training she uses, and develops further, every day in the lab that she runs here. In the world of ceramic artists, there are just some people who are true materialists, and Rachel is the type of person who has a LOT to say about nepheline syenite (and molochite...and cryolite...). Basically, if you spend just five minutes in her work space you know this goes beyond extensive knowledge -- it's a passion for her. She's even a published author on this front -- check out her great project on the effects of sintered borax in Clay Times!

Shhhh! A Rachel in her natural habitat.

Since joining our team, Rachel has tackled numerous contract projects and has definitely proven her salt. And yes, she also has plenty to say about salt! Because of this, she is now serving as a consultant for glaze-specific projects here at The Ceramic Shop.  Say you have to do a bunch of cone 6 glaze tests for your arts center, home, or classroom, and you either don't have the time, know-how, or simply lab access -- Rachel can do all of this for you, complete with well-documented results.  Say you are looking for just the right butter yellow matte glaze for your stoneware, and you really just don't know where to begin - for a consulting fee, Rachel can do the research and then mix up and tests the glazes. Perhaps you have a project that's a little more production-based -- last year, Rachel took on the glazing and firing of about 1500 very precise and fragile elements for a major installation.  When it comes to clays and glazes, she can do it all!

Our consulting fee for this service begins at a reasonable $50/hr.  If you would like to get a quote for a project, you can give us a call at 215-427-9665 or email Mark at mark@theceramicshop.com or Rachel at rachel@theceramicshop.com.


Thursday, February 6, 2014

Catalyst tools for every occassion

In keeping up with our NCECA countdown, I finished some of the mugs that I threw a couple days ago using Princeton Artist Brush Co.'s Catalyst tools.  These tools are great because they do double (even triple) duty as studio implements -- I first used Catalyst Contour Rib 24 as a rib to make a cool pattern on the exterior of this thrown form, and then I used it again to make a handle. 

Brought to you by Catalyst Contour Rib 24.

To make the handle, I rolled out a thin slab and made sure that the surface was a little moist and slick.  I dipped the Catalyst rib into my water bucket, and then made a series of firm, downward stroked across the surface of the clay.  The idea is to dig the patterned surface all the way down so you get the same clean, carved lines seen on the outside of the mug's body.  Then, I took the slab and rolled it -- so that pictured handle is actually hollow.  After that, I realized that the handle kind of looked like a caterpillar, so I added some handbuilt elements for a decorative -- some might even say a little creepy! -- effect.

Hello there.

So, yes, moving this form through the finishing process will be fun -- I'm particularly excited to see what sort of cool textures I can get when I combine these Catalyst tools with Amaco's velvet underglazes. Stay tuned on that front -- anyone who has visited my studio knows how much I love underglaze + texture.

I also added a few more simple slab handles to some other forms I had thrown.  My goal here was to experiment with the versatility of the Catalyst tools, yes -- but also, I was interested in seeing how they could lend themselves to projects that are quick and easy to complete, while still delivering impressive results.  The handles below took all of 5 minutes to make and apply -- again, I simply rolled out a thin slab, made sure both the surface and tools were moist, and then confidently dragged a pattern across the surface - for these handles, I used Catalyst Contour Rib 62.  In the mugs below, I simply cut geometric slabs and applied those to the forms (with a minimal amount of clean-up). 

I handled it.

Nice, simple, clean, and quick -- which makes the Catalyst tools a great addition to a classroom or any studio where projects have to be completed in a limited time. Also, as a side note about the finishing of the bases of the mugs shown above, I used my trusty Xiem Sgraffito & Detailing set to carve a cool pattern when the bodies were leather-hard.  You can carve later in the game, yes, but doing it while the clay is still a little bit wet cuts down on the dust you create and the strain on your wrists.

So that's what I've been doing to prepare our demo's for NCECA - what have you been doing to get ready for the big conference?  41 days and counting until The Ceramic Shop descends upon Brew City! 

Wednesday, February 5, 2014

Countdown to NCECA!

Like many people and businesses embedded in the ceramic arts, we are getting very excited for NCECA here at The Ceramic Shop!  For the uninitiated, NCECA is the National Council on Education for the Ceramic Arts, and this year the annual conference is being held in Milwaukee.  This means days of awesome demos, talks, and hanging out with ceramic artists - March 19th through 22nd is going to be awesome.  

The Ceramic Shop will have a booth as we usually do, and this will be a great opportunity for anyone who stops by to look at the products that we've developed over the past year or so, including a new and improved Wacky Wax and the increasingly-popular Ware Repair.  We will also have a demo station this year, with a focus on the awesome ribs from Princeton Brush Co.! We started carrying this line of tools last year, and I've had the opportunity to use several of them.  These tools come in a variety of very cool textures, and they are also extremely ergonomic, which makes them especially nice for throwing smaller forms like mugs and pitchers. 

Because I will be doing demos at the conference, I've been practicing using many of the different Princeton Artist Brush Co. tools.  This has been a great reason for me to hide out in my studio (even more) in a bid to bypass this silly slushy winter, and my results, so far, have been pretty good.  I'll post some in-progress shots and update as these pieces move through the firing process so you can see how the tools affect the final outcome, beginning to end.


Testing, testing: I worked with a few of the catalyst contour ribs on some wheelthrown pottery.  


Here are my first, and clearly recent, results.  
Already looking forward to trimming these today, 
and making some new ones!

Are you looking forward to NCECA?  If you plan on attending, please stop by our booth and say hello!  


Wednesday, January 29, 2014

New Ribs by Xiem!


It seems like every month, we get in more and more awesome products from Xiem, one of our favorite young tool companies. In addition to all of their products just being very high-quality -- stainless steel!  carbide!!! -- these tools never cease to amaze us with their simple innovations.  Say you're a potter who frequently uses a sponge on the end of a stick -- Xiem makes a version of that, complete with a telescoping handle. How many times have you used the ubiquitous wooden throwing stick and wished that the shape was just a little different? Xiem reconfigured that classic in a flexible, coated-wire form in their Potter's Wand II. Basically, this California-based company just takes the ceramic studio staples that we all know and love and just makes them better. 

This month, all of the potters here at The Ceramic Shop have been excited over Xiem's new line of rubber ribs.  We love our rubber ribs!  Because we carry so many -- from the Kemper standard to the very extensive and variegated line of Sherrill MudTools -- we've had plenty of opportunities to test them.  These new offerings from Xiem, though, actually do manage to bring something new to the realm of rubber ribs.  The shapes are well-considered, yes, but my favorite feature of this new line is the thickness.  All ribs are a hearty 1/4" thick, which gives you a little bit more of a grip when maneuvering large pieces of clay.  


Also, while I have been loving these for work on the pottery wheel, they can also double as handbuilding implements. Currently, I am really enjoying the versatility of Xiem's orange #5 rib.  This large triangular rib is soft enough to use on smaller wheel forms, but has this nice curve that makes it perfect for shaping larger bowls.  I've been using it for my slab work quite a bit, too, as its softness and flat side make it a really good tool for smoothing down the surface of my large serving platters. 

We love to hear YOUR feedback about tools that you love, as well!

Thursday, January 23, 2014

Carve it up

We have gotten SLAMMED with snow in Philadelphia this week!  When the weather outside is frightful, though, there's no better excuse for hunkering down in the studio.  I know that my own pottery changes with the seasons; while I often prefer a more neutral, natural color palette, in the grey cold dull winter I want to see color

Winter is also great for carrying out detail-oriented projects in your studio -- if you're like me, the frigid outdoors aren't terribly tempting.  As such, this can be a great time to explore Amaco's Velvet Underglazes.  These flexible underglazes provide a great pop of color into your work -- they're available in over 45 different shades -- and lend themselves to fun sgraffito or mishima projects.  Here's an example:


This is a 15" platter made from a rolled-out slab of Standard Stoneware 181, which fires white.  I then planned out a design, and working like a printmaker -- that is, moving from my lightest underglaze to my darkest -- I started blocking out my design on the leather-hard form.  Here, I first used Amaco Velvet Underglaze 343 Chartreuse (seen in the center -- here's the link: Amaco VUG 343 Chartreuse) and then I went around the edges and started cutting in detail with the much darker Amaco Velvet Underglaze 332, Teal Blue (Amaco VUG 332 Teal Blue). I then went in and painted in a centerpiece, not pictured above, with Amaco Velvet Underglaze 361 Jet Black (Amaco VUG 61 Jet Black).

After all of these underglazes were applied to my satisfaction, I carved into the piece -- still leatherhard -- using a variety of different sgraffito tools.  Currently, I am loving the sgraffito set by Xiem.  It comes with seven different tools that all leave a different mark, and they are hearty stainless steel.  When I started doing these intricately-carved platter, I used a generic ribbon kit, which was great -- until the tools' edges started dulling or the wires snapped. Xiem tools are fancy and awesome, though.  


The nice thing about doing this color-block sgraffito method is that the end results always look impressive.  Any smudged line that you might create when blocking out the colors can just be scraped away when you cut into the surface with your sgraffito tools!  It's really a much more forgiving method than people realize, so go on and let your audience be impressed.  Here is my finished (but not yet fired!) result:


Once fired, the carved linework appeared a crisp white, and the underglazes richened in color a bit -- although one thing I do like about this line is how what you see is what you get -- the Amaco Velvet Underglazes definitely fire very close to the color they they appear when green, which is a very nice feature. Likewise, these underglazes look great glazed or unglazed, although I recommend glazing for food surfaces. 

Platter party!

Check out our entire inventory of Amaco Velvet Underglazes here and keep in mind that we sell these in a few different sizes!  In addition to the standard pint, we carry all Amaco Velvet Underglazes in a convenient 2-oz. jar, which is perfect for completing a few projects or just testing new colors.  To give you an idea as to how far they go, think of them kind of like a paint -- you will often have to apply a couple coats -- say, 2-3 -- but the platter above was just one of several I was able to complete with less than a single jar of each color I use.  The Velvet Underglazes are also great under a wide variety of firing temperatures.  Although they appear most true to color when low-fired, most, if not all, of the colors can pretty handily look good in cone 6 (which is what I typically fire).  Any questions?  I'm happy to answer them!  Please don't hesitate to get in touch at gina@theceramicshop.com.